 Click here to see us on Facebook
  Follow Me on Pinterest
Assembly line
Yesterday I finished assembling the crazy quilt blocks for the patchwork side of the vest. When I am sewing together a large number of blocks that need to be in a specific order I find it t best to approach it as an assemblyman working on the line. I always work from top to bottom and from left to right. I put little stickers on the row vertically (in this case, 1-6) and then I chain stitch the top block to the next block or in this case 1 to 2, 3 to 4, and then 5 to 6. I then clip them and then attach the pairs to each other. I put a pin through the top block. Many times I have gotten the row turned around and attached it upside down so now I use the pin. I then press all the seams in the same direction. After I assemble the next row I then press the seams in the opposite direction so that when I attach it to the preceding row, the seams will lock. I find it easier to attach the rows as I go along. It took me aprox. an hour and 20 minutes to get the blocks assembled and pressed, Now it was time to cut out the vest pattern from the assembled patchwork. Since I had used up all the main fabric and had put a decent amount of labor into the patchwork, I checked and then rechecked myself before cutting the 3 pieces for the vest (the two fronts and back) correctly, making sure the horizontal rows lined up to one another on each piece. Even though the sides of this vest are not actually sew together, visually it would not be pleasing if they didn't line up. A mistake at this point would be VERY costly. I needed to decide how I wanted to quilt the vest so I quit for the day to let things settle.
This morning I decided to embroider the crazy quilt blocks since they do lend themselves nicely to embroidery. I felt that some interfacing was in order since I have found that embroidering on just one layer tends to make the fabric pucker and stretch. I used fusible non-woven interfacing for featherweight and mid-weight fabric. This interfacing is very lightweight so it will stabilize the vest without adding a lot of weight to it. This is the first time I have ever used this product. I spent some time repressing the back of the vest and got the seams as flat as possible. The directions say to cut the interfacing 1/8" smaller than the facing and then steam based it along the edges with an iron. I then applied a damp cloth and pressed firmly for 10 seconds, repressed the front and let it cool. Now the fun begins....I get to play with the embroidery stitches on my machine. I used two different colored threads, the golden brown color popped nicely on the dark blue fabrics and turquoise and the dark teal thread I used to embroider the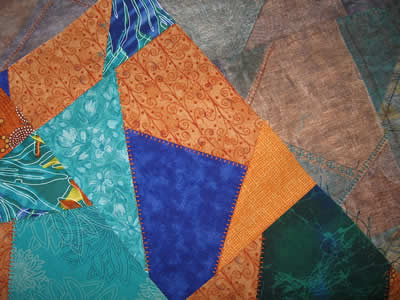 golden brown fabrics. The next time I have a large area I want to embroider I will definitely use this interfacing again. It adhered nicely and kept the blocks from stretching out of shape while I was embroidering them. Well worth the time it took to cut it out and adhere it. The picture shows some of the embroidery and also the interfacing,
.
- Sandy's blog
- Log in to post comments