 Click here to see us on Facebook
  Follow Me on Pinterest
Saying yes to glue!
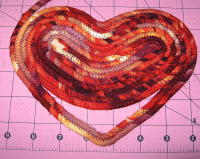
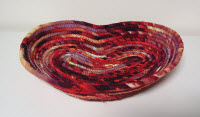
What better time to take on a new project than the New Year. Back in the Spring I started making coiled fabric bowls which I learned how to make by a tutorial a friend suggested that she found on the CraftStylish website. I blogged about making my first bowl on April 2, 2013 which can be accessed through my blog archive. I later found out that Susan Breier had written a book called "it's a Wrap" about making clothline bowls. I recently purchased the second book where she discsses how to make differently shaped bowls which included square and heart-shaped. This past week I made my first heart-shaped bowl.
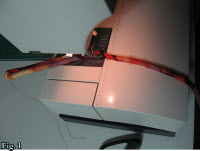
One of the items on the materials list is a glue stick. This was something new to me but since I was going to follow the directions in the book, I thought best to do as suggested. I dug out of my stash what I thought would make an intersting heart shaped bowl and with with glue stick in hand, I began cutting stripes and wrapping them around the clothesline. WOW, LOVE the glue stick! The most difficult part of making a clothesline bowl in getting is started, incorporating the next strip and also ending the bowl. The glue COMPLETELY streamlined this process.
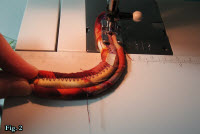
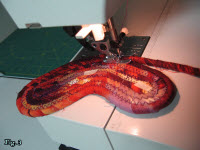
To make a heart shaped bowl that has a point (you can make one wihtout a point) one starts out with an oval base which I have made mnay times. The instruction called for a 5" baseline measurement which means that the beginning of the oval will be 5" (10" folded in half) You go around the corner ONCE and place a piece of masking tape at the corner. . It is at this point where all transitions will be made on this bowl. On the next pass you take the two ends and press them together into a U shape with 3" between the ends. I made sure I was exactly in the middle when I made this bend so that my heart shape would not end up wonky. Next, I contunied making the base going around this U shape until it was a bit smaller than the size I wanted (there are two more coils to add to shape the point of the heart). Now it is time to shape the V. I took my base over to my cutting mat so I could use it's grid. The instructions said that the V should be approx. 1" below the base so I pinned the clothesline to the right side where the instructions indicated, pulled the line into a V shape below the base and then brought it up the other side of the base and pinned it at the same point on the other side. Once I checked to make sure everything was centered it was time to sew it in place. I began sewing where I left off and proceed down to the gap, I veered off and sewed along the bottom of the base and when I got to the other pin, I incorporated the clothesline that would be the bottom of the V. It is on the second pass along the V where you actually make the V permanent so I marked the center of the V with masking tape and proceed arond the base a second time being very careful to maintain the V shape Now it was time to fill in this V with small pieces of wrapped line. Starting at the bottom of the base with a very short piece of rope, I wrapped it and sewed it in place. I continued in this manner with stlightly smaller pieces of rope until the gap was filled. The trickest part is the very last piece since it has to be forced into the base without leaving a gap. I wrapped a bit of fabric without rope in it on both sides of these smaller pieces of rope which helped fill in at the sides where it was very narrow so there wouldn't be a gap.. If there is a gap, it was suggested that a small patch of fabric be zig-zagged over the hole. Once I had this heart shape completed I started tipping the base at the tranition point (where I had but a piece of tape at the beginning of the bowl) and continued up the side in the same manner as I did when making a round or oval bowl. If I was going to be changing fabrics this point is where I would do that also. I chose an interesting enough fabric with lots of verigation in it so that it would indeed making an interesting looking basket all on its own. To make a bowl without a point, you just keep coiling around the U shape until the base is the size you want and then start tipping the base at the transision point and add coils until the sides are at least 2" high.
The best part of this project, other than learning to make something new, was the discovery of using glue. It kept everthing in place beautfully and made it much easier all around. When incorporating a new strip wjhen not using glue one has to over wrap over rthe previous wrapped strip to hold it in place and then clip it so that it does not come unwound until you sew it. This is not necessary when using glue so the other advantage was, I used less fabric AND if you re making a one fabric bowl, you can wrap the entire clothesline before you start sewing...brilliant!
p.s. I have tried and tried and tried to post the photos that go along with this entry. My deepest appologies I was not able to get them to post. As we all know, a picture is a very vuluable tool when trying to figure out something for the first time so I do hope this makes sence without the photos.
- Sandy's blog
- Log in to post comments